Saturday, March 26, 2011

Homemade Spring Rolls & Fried Rice—Guest Blog: Ami Rothberg

When I was growing up my family ate a lot of spaghetti, but my mom also had a few recipes that stuck in my mind. Some of them, like “noodle-bump soup” and homemade macaroni & cheese probably stuck somewhere else (say, my ass). But others, like homemade spring rolls and fried rice, are recipes I LOVE, not just because they are so easy, also because they are SO TASTY! I made these the other night for Katie and I, and we’ve been eating them for the past three days. Finally (or maybe sadly) they are gone! They turned out spectacularly but making them tends to be really messy, so be prepared for that!

Spring Roll Ingredients

2 packages Egg Roll wrappers

3 large carrots, shredded

½ head red cabbage, shredded

1 head bok choy, chopped fine (leave out leafy parts)

IMG_1134

1 medium yellow onion, chopped

2 large chicken breasts, cut into small chunks

2 Tbsp sesame or canola oil

1 C soy sauce

Oil for frying rolls

Filling:

Add oil to large crock-style pot

Cook chicken until white

Add onions, cook until nearly tender

Stir in rest of vegetables and soy sauce, cover and cook on low until tender

Allow to cool uncovered until room temperature


IMG_1135

Egg Rolls:

Place on egg roll wrapper on a clean surface with a corner facing you

Dampen wrapper with water and paper towel

Squeeze juice out of approximately ¼ C of filling and place in middle of wrapper

Fold in bottom corner, followed by side corners and roll into top corner of wrapper

IMG_1138

Place into skillet with oil heated to medium-hot

Cook on all sides until golden brown

Allow to cool on newspaper with paper towels layered on top to soak up excess oil

Enjoy with your favorite sauce—I prefer a mix of spicy mustard and soy sauce!

Fried Rice Ingredients

1 tsp oil

2 eggs

4 C white rice

left over sauce from spring roll filling

Scramble one of the eggs in the oil in a deep skillet

Add rice and ¼ C left over sauce with as many leftover vegetables as you desire

Stir in second egg and cook until nice and sticky!

You may want to try:

Lowering the sodium with low-sodium soy sauce

Using a different pan to fry the spring rolls to avoid the gigantic oily mess

Wednesday, March 23, 2011

Root Beer Cookies

St. Patrick's Day has come and gone. We had a work potluck at work to celebrate. So when i was wracking my brain trying to figure out what to bring to it the only thing that makes me thing of St. Patrick's Day was beer. However, you cant bring that to work let alone a workplace that is based on getting people sober. So i picked the next best thing: Root Beer Cookies.

rootbeer

I made these cookies for the potluck and they turned out edible...but i didn't think they were amazing. I don't know if it was due to feeling under the weather so the cookies weren't baked with love or if it was just due to the first time having made them, but i wasn't satisfied with the turnout.

I made them a second time over the weekend while i was home visiting family. My aunts told me they thought the Root Beer Cookies sounded good and asked for the recipe...I decided why just give them the recipe when I am home and can make them myself! This time the cookies were FANTASTIC!! A million times better. Again I don't know if it was that I felt better or what it was experience with the recipe, but they were far better than edible, they were scrumptious!

IMG_1127


Ingredients

1 cup butter, softened
2 cups packed brown sugar
2 eggs
1 cup buttermilk
3/4 tablespoon Root Beer Concentrate or Extract
4 Cups all-purpose flour
1 teaspoon baking powder
1 teaspoon salt

Frosting
3 1/2 cups powdered sugar
3/4 cup butter, softened
3 tablespoons water
1 1/4 teaspoon Root Beer Concentrate or Extract

Preheat 375
Bake for 10-12 Minutes

The dough for these cookies comes out like a sticky mousse. I recommend having a cookies scoop for these or your hands will be a total mess. I added a touch more extract to the frosting the second time to give them a little extra flavor.

IMG_1131

I am not sure why but the flavor of these cookies is better the second day!

P.S. These are not the most attractive cookies....pretend you're blind and your taste buds will be in HEAVEN!!


IMG_1128

Sunday, March 13, 2011

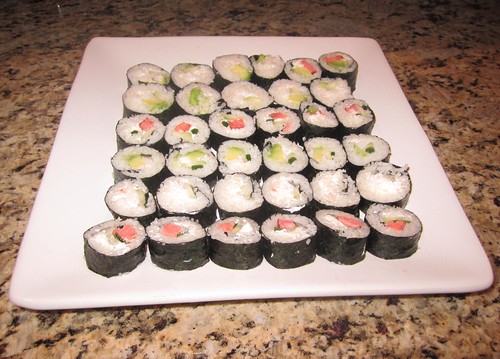
Sushi

Sushi has not always been my thing. I was actually very late to jump on the sushi bandwagon. I had my first roll a little over a month ago; it was the plain and simple "California Roll." I am a tad scared raw or fishy things. Ever if it's imitation crab, I still like it!

After having Sushi I wanted to go home and learn how to make it. Ami has made Sushi before so i asked if she wouldn't mind teaching me the art. A little disclaimer: We don't have a sushi roller so we improvised and just did it with our hands, which means our rolls weren't as tight as they could have been if we had the proper equipment. We also have no training and so the steps listed below are in no way professional steps, just the steps we took.

Here goes our Sushi Adventure

We stuck with two different kinds of rolls to make it easier ( and less expensive!) on ourselves.

Rolls
California Roll
Small Package of imitation Crab Meat
Mayonnaise
Avocado
Rice (sticky white)
Seaweed Wrap
Rice Wine Vinegar

Philadelphia Roll
Smoked Salmon ( Or fresh if you trust your source)
Cream Cheese (Brick so that you can slice into strips)
Green Onion
Cucumber
Rice
Seaweed Wrap
Rice Wine Vinegar

Wasabi
Soy Sauce
Pickled Ginger

STEPS

Step 1) Cook Rice

Step 2) Chop all veggies into long thin slices

IMG_1114

Step 3) Chop all the Crab into very small pieces and add Mayonnaise until there is enough to make it easy to form (1-2 teaspoons)

IMG_1116


Step 4) Lay out one seaweed wrap. Cover 3/4 of the wrap closest to you with a thin layer of rice, pressing firmly

Step 5) Place a row of meat/vegetables two or so inches into the rice.

IMG_1117


Step 6) Roll the edge of the wrap closest to you away, covering the meat/vegetables. Tuck the edge in and pull it back toward you while pressing down. Keep pressing and pulling as you roll. Leave a bit of the wrap unrolled. Use the vinegar to wet the remaining so it will stick when you finish rolling.

Step 7) With a shirt knife cut in the middle of the roll. Place the (not) two parts of the roll next to each other with the cut edges aligned. Continue cutting the roll into one inch segments while being cautious not to smash the roll.

IMG_1118


Step 8) Place the pieces on a pretty plate and admire your creation. Eat with wasabi, soy sauce, and ginger if you choose.

IMG_1122


This was a fun culinary adventure. I am the type of person who is fine with following a recipe that tells me how much of each ingredient is needed and having the steps laid out for me when trying a new dish. However, this was nothing like that. Making Sushi was care free and dun. The more rolls we made the more we switched things up. What started out as California and Philadelphia rolls turned into 'lets try this' roll with both types of no fish , some vegetables here and some here.

I enjoyed making Sushi and can't wait to do it again and become better at rolling. Because i am terrible. My rolls were what would be equated to a BIG MAC sushi rolls.

IMG_1120


Thanks Ami


Friday, March 11, 2011

Crappy Chocolate Chip Cookies... A guest blog by Ami Rothberg

It's appropriate that I am Katie's first guest-blogger. I'm her roommate, future sister-in-law, taste-tester and editor. The poor girl puts up with my insatiable hunger and never complains that I usually eat everything before she has time to get seconds on her fabulous dinners. Most every night after I eat more than my fair share of whatever scrumptious concoction Katie has come up with, I get the urge to eat more, usually something sweet, which is where this blog begins.

Last night after the EPIC mahogany chicken, mashed "potatoes," and roasted asparagus (YUM!) I decided to bake some cookies with the dark chocolate chips I picked up at Winco earlier that day to replace Katie's chocolate chips I ate the previous nights in an attempt to satisfy my sweet tooth. I've had a lot of success with cooking and baking in the past. I can think of few major kitchen debacles in my past, although I rarely experiment enough to experience problems. Suffice it to say I have (had?) confidence in my ability to follow recipe directions on the back of a chocolate chip package.

I swear I followed the directions as written, with one exception: I used fake sugar instead of regular sugar. This is the only thing I can think to have caused the disaster that resulted. My dark chocolate chip cookies didn't exactly melt in my mouth. What was pretty tasty cookie dough turned into chalk textured, dark-brown, crumbly garbage. Katie was so polite when she claimed they were tasty, but I didn't believe her. The taste of chocolate Katie claimed to satisfy her chocolate cravings was lost on me. I felt like a dog with peanut-butter in his mouth, trying to swallow without much success. Ok, so maybe that's a bit of an exaggeration, but I was really depressed at the outcome of my baking.

You might think that I just threw the cookies away, but if you know me, you would understand that I kept them for two reasons: first, they have chocolate and sugar in them, making them useful for something, somehow, and second, I don't really like to waste. I put them in a container in the fridge with the thought that maybe the easily crumbled cookies might be put to use as cake pops or something. This afternoon I decided to give them another try. Sitting in the fridge for 12 hours did actually help the cookies. They weren't so crumbly and were actually edible, but that doesn't mean I'm going to post the recipe (I don't have it anymore anyways!).

I realize now that part of the reason the cookies were so awful last night was that they are dark chocolate, thus not as sweet. I usually prefer dark chocolate over milk chocolate, but maybe this recipe would be better with milk chocolate chips, who knows. I'm not really eager to try this recipe again, and honestly think Katie is the baker in the house so I don't think I'll be giving it another go any time soon. I'll just wait for Katie to make some more of her EPIC dinners, and even more EPIC desserts. Ya'all have some majorly tasty recipes from Katie to look forward to, I'm sure. Moral of this blog's story: it doesn't always work out, even if the recipe seems legit. Oh, and let those who know what they are doing bake the cookies (cough, cough, KATIE).

Hopefully my next guest blog will be about a recipe that was a success instead of an EPIC FAILURE!

Thursday, March 10, 2011

EPIC Dinner

This is another great guilt- free dinner. As Ami would say it was EPIC! I was extra hungry tonight so I made two side dishes: roasted asparagus and surprise mashed “potatoes.” Surprise mashed “potatoes” have become my favorite thing since giving up carbohydrates. They give you the feeling of having regular mashed potatoes without the guilt.

Mahogany Chicken Ingredients

1/2 cup rice wine or medium-dry sherry

1/4 cup strong-brewed black tea

1/4 cup unsweetened pineapple juice or orange juice

2 Tbsp reduced-sodium soy sauce

1/2 tsp ground cinnamon

1/2 tsp ground ginger

1/2 tsp freshly ground pepper

1/4 tsp salt

4 boneless, skinless chicken breasts, trimmed and cut into small cubes

1 tsp peanut or canola oil, divided

1 small red bell pepper, diced

2 scallions, sliced

1 clove garlic, minced

Steps

Step 1) Combine wine, tea, juice, soy sauce in a bowl; set aside.

Step 2) Combine cinnamon, ginger, pepper and salt in a small bowl. Cut chicken and rub the spice mixture evenly on both sides of chicken.

Step 3) Heat 1 1/2 teaspoons oil in a large skillet over medium-high heat. Add the chicken, reduce heat and cook no longer pink inside. Put on a plate and set aside.

Step 4) Add the remaining 1 1/2 teaspoons oil to the pan. Add bell pepper, garlic; cook for a minute or so. Add the reserved rice wine-tea mixture. Bring to a boil, scraping up any browned bits.

Step 5) Reduce heat to low and add the chicken.


Roasted Asparagus

1lb Asparagus

1 ½ Tbsp peanut oil

1Tbsp Soy Sauce

1 tsp Sesame Oil

2 tsp sesame seeds

Steps

Preheat oven to 400 F

Step 1) Cut asparagus into 2 inches long pieces

Step 2) Place into a bowl with the peanut oil and mix until each piece is covered

Step 3) Place on a baking sheet and put into oven cook for 15 minutes

Step 4) Mix the soy sauce, sesame oil and sesame seeds into a bowl

Step 5) Take out asparagus and add to mixture

Step 6) Place back on baking sheet and into the oven for another 5 minutes


Surprise Mashed “Potatoes”

1 head cauliflower

1 Tbsp butter

Splash of half-and-half or milk

Salt and pepper to taste

Steps

Step 1) Cut cauliflower into chunks

Step 2) Steam cauliflower until tender

Step 3) Add to blender with butter, and milk

Step 4) BLEND… It takes a while to get to a mashed potato consistency

Step 5) Salt and pepper to taste

IMG_1108


Bon Appétit

Things to do for next time

-Cut the chicken into smaller chunks

-Cut the pepper into larger pieces so that they are easier to fork and don’t end up under the chicken and not eaten!

I have always had a love for cooking, the last few years the love has grown stronger. When I am at school I am thinking about trying a new recipe, when I am at work I am wishing I were home baking, and when I am cooking/baking I am super happy. Sounds a tad obsessive I know, but it is the one thing I can do to escape the stress of school!

These recipes were easy to make and very rewarding in taste. I love to make food knowing it is going to make someone happy. Ami has been a huge help! She has been the perfect food critic.

Recipes to come

Rootbeer cookies

Red Velvet Cake Pops

Sunday, March 6, 2011

Potato Chip Cookies

The ultimate comfort food: a bag of salty potato chips combined with butterscotch cookies…you’d think there’s no way you could go wrong. I have made cookies a million times before and never had trouble like I did with this baking experience. I went through three batches and an extra trip to the grocery store before they turned out. The first two batches came out flat and looking like peanut brittle, only not as yummy.

IMG_1101

Where did I go wrong with these?

In the end they were worth all the trouble… Third time’s a charm!


Pre-heat oven to 375°F


1 cup butter-flavored shortening or butter

¾ cup sugar

¾ cup packed brown sugar

2 eggs

2 cups all-purpose flour

1 teaspoon baking soda

2 cups crushed potato chips

1 cup butterscotch chips


Step 1: In a large bowl cream shortening and sugars until light and fluffy

Step 2: Beat in eggs.

Step 3: In a separate bowl combine flour and baking soda;

Step 4: Gradually add to creamed mixture and mix well.

Step 5: Stir in potato chips and butterscotch chips.

Bake 10-12 minutes

IMG_1103

Enjoy this amazing Sweet and Salty Treat

Next time I’m going to try…

½ cup butterscotch chips ½ cup chocolate chips

Wavy potato chips instead of the classic

Thursday, March 3, 2011

Easy Thai Coconut Chicken

Here goes my first culinary adventure! This is a quick, easy and guilt-free dinner. I am doing guilt-free dinners because in order to lose a few extra pounds I have given up bread, pasta, and rice.

Here are the step by step instructions with pictures, to make a quick and painless dinner.

Ready, Set, Go!

IMG_1080

Thai Coconut Chicken

1 lb. skinless chicken breasts or thighs, cut in bite-sized piece

1/2 medium onion (optional, but I like it), chopped

Medium red Bell pepper, chopped

1can coconut milk (can use light or regular)

2 tsp hot sauce

1 tsp curry

Salt or seasoning salt to taste

Steps

Step 1: Heat 1 Tbsp oil in large skillet… I used peanut oil but any oil will work

Step 2: Chop onion… add to skillet and start sautéing

Step 3: Chop pepper and add. Cook until onion is nearly soft

Step 4: While you are cooking onion & peppers, chop chicken

Step 5: Add spices

Step 6: Add chicken… Stir until cooked through

Step 7: Add coconut milk


Cauliflower Rice

IMG_1081

1 head cauliflower

Salt and pepper to taste

Steps

Step 1: Run cauliflower over cheese grader to make it rice size (this would be much easier with a food processor!)

IMG_1082

Step 2: Microwave it in a covered dish for 6 minutes. DO NOT ADD WATER!!

Time to enjoy… Spoon cauliflower in the bottom of a bowl and cover with Thai Coconut Chicken.

Check out the finished product:

IMG_1084

Happy Guilt-Free Dinner

If I were to make this again I would...

Use less hot sauce. Kleenex was required.

Use a food processor for the cauliflower to reduce the epic mess!

Use less coconut milk to make it less saucy

Mix it up with some more veggies, like broccoli or maybe snow peas